Monthly Archives: March 2013

Working on my New FO wish-to-do list

It’s been a very busy time around here lately. The Little Button was pretty sick for more than a week, the nights were veeeeery hard and it was even harder having to go to work in the morning… And he was teething as well, so you can imagine…  Then, thankfully I had a few days off and could prepare Hana’s birthday party, her birthday crown and do some sewing too. I had a good amount of alterations to do among the projects I really wanted to work on.

IMG_6262

Hi ha hagut molt de moviment aquestes darreres setmanes per aqui. El Botonet es va posar malalt durant mes d’una setmana, les nits eren horroroses i mes horroros era haver d’anar a treballar al mati! A mes, li estaven sortint dues dents mes, ja us ho podeu imaginar. Menys mal que despres vaig tenir uns dies lliures i vaig poder dedicar-me a preparar la festa d’aniversari de la Hana, la seva corona i tambe cosir una mica.

IMG_6051

I’ve been able to do a lot of progress on several things, but the one I’m really enjoying the most is Conor’s quilt, which I had in my NEW FO Challenge WIsh-to-do list. I have made 4 stars so far and I’ve bought some DMC Perle cotton thread for hand quilting it. Now you know why I’ve been taking up some embroidery projects lately, I’m just practicing for the big day!

IMG_6141

He pogut avançar bastant en alguns projectes, pero el que mes m’esta agradant es el quilt que li estic fent al Conor, i que tenia a la llista de coses per començar al 2013. Ja tinc 4 estels i ara toca fer-los ballar, inclinant-los dins d’un altre bloc. He comprat fil perle de DMC per intentar fer l’encoixinat a ma. Ara ja sabeu per que estic fent tants brodats ultimament, m’estic entrenant pel gran dia!

IMG_6258

I hope to have this quilt finished by his 1st birthday… I still have 6 weeks to make it happen.

DSC_0113

Espero tenir-lo acabar per al seu primer aniversari! Encara em queden 6 setmanes!

DSC_0118

Here’s his new 2 top teeth!  Les dues dents de dalt que tant malament ens ho han fet passar…

DSC_0126

13 Comments

Filed under COSTURA- SEWING, EMBROIDERY, FAMILIA, FAMILY, PATCHWORK

4

IMG_6264

My sweet beautiful Hana.

She’s 4 today yesterday (when I was writing this post it was the 26th of March, Hana’s birthday… but when I finished and hit the publish button it was already past midnight… just realised that!!! 😉


30032009023

I caught her, not long ago, laying on my bed pretending to read a book. ‘I’m reading a story’, she says. ‘I see…’  says I. To Kill a Mockingbird. She asked me was it a nice story. I said it was, that it was probably one of my favorite ones and maybe it will be one of hers too, or so I hoped… She asked me to read it. ‘But there aren’t any pictures here, Hana. It’s all “abc’s”. ‘But I want you to read it, just a little bit…’


IMG_0486

I thought that was funny, and I knew she was tired, so I thought it was a good way to make her go to sleep quickly (SO I COULD DO A BIT MORE SEWING!!!). Ok so, and convinced that she would asked me to read another story after the first sentence, I started.

IMG_0992

‘When he was nearly thirteen, my brother Jem got his arm badly broken…’

And a loooooooong list of questions started. ‘Why Jem got his arm badly broken?’, “did it fall off?’ ‘who’s Jem?’ ‘ how he did it?’…

I explained (being used to so many interruptions at every second word).

‘Oh’, she says.

DSC_0339

After the first page I asked her should I stop and to my surprise she said no! I kept on reading, until Boo Radley appeared. More questions. ‘Is he spooky?’ (she loves spooky things). ‘Do people get scared in his house?’. I explained again about who Boo was. Then another ‘oh’.

DSC_0299

I read three pages, and then we decided to go to bed and to leave the rest of the story for another day.

DSC_0033

This happened about 2 months ago. I thought it was pretty amazing that she was actually listening and just getting what she wanted to get. She was pretty concerned about Jem’s arm and kept asking me about the story for days, and then of course that lead to other questions about anatomy and the human body, bla bla. I find this so amusing, I love when she asks me all these questions! and boy does she ask…

DSC_0320

I told her dad about this and his eyes lit up. Jaysus! Maybe I can start reading The Hobbit to her!!!

Oh dear.

DSC_0428

So here’s my baby Hana, who doesn’t let me call her baby anymore. The big sister who loves her brother to bits and calls him the best baby in the whole world. She’s the one who asks me do I want to play with her and I say ‘yes!’, and then she says, ‘ok, pretend you are my mum, ok?’, the one who asks me ‘why are the hot days not happening?’ and the one who can’t wait for spring to come because she really really wants a pet ladybird but don’t worry mummy she’ll stay outside…

IMG_6282

PER MOLTS ANYS HANA

T’EsTiM0!

25 Comments

Filed under FAMILIA, FAMILY

A Patchwork Finish, Embroidery Progress and an Offer…

Wow! Lots to talk about today!

Pol’s quilt is finished and has been sent away in its own little bag. I used some charms from School Days mixed with some other squares of Kona yellow and green. I had a backing in mind for it, but when the top was finished I didn’t quite like the combination so I run to the local fabric shop and found this argyle from Tanya Whelan.

IMG_5996

IMG_5997

El quilt del Pol ja ha volat cap a Catalunya! La tela es d’un charm pack de School Days i el darrere es de la Tanya Whelan. Vaig anar a la botiga de teles volant perque la tela que habia triat en un principi no em va agradar un cop el davant estava acabat.

IMG_5998

IMG_6000

*******************************

Would you like to see my embroidery progress…?

Voleu veure les noves puntades que he afegit al mostrari…?

IMG_6194

I added a few more stitches to my sampler hoop and I’m so happy I finally know how to make French knots!!! So many times I had tried by reading instructions and ended up with nothing… but now I know you have to hold the thread with your other hand while you pull the needle out.

Per fi ja se com es fan els nusos francesos! Mai no me’n sortia i amb aquestes instruccions tan clares ja els se fer.

********************************

Now, you remember I tod you I used to cross stitch? I was doing some spring cleaning and I found out a pile of Jeremiah Junction Cross Country Stitching patterns that I know I won’t use anymore. I have 29 of them and you can see some of them here below:

Recordeu quan vaig dir que fa temps feia punt de creu? he estat fent neteja i he trobat una pila de patrons de Jeremiah Junction Cros Country Stitching. No els fare servir mes. En tinc 29 i aqui en podeu veure una mostra:IMG_6199

IMG_6200

IMG_6201

IMG_6202

I will gladly send them to any of you who would like to use them.

I will make 3 sets, two of 10 patterns and one of 9, or depending on the demand, 4 or 5 sets. I’ll take photos of every single one of them so you can see and choose. Just leave a comment here if you are interested. It will be on a first come first serve basis.

Si algu hi esta interessat, els hi enviare. Fare dues piles de 10 i una de 9, pero si hi ha mes demanda, faria piles mes petites. Nomes cal que deixeu un comentari dient-me si els voleu i ja em posare en contacte amb vosaltres. Fare fotos de cada un dels que tinc per aixi poder triar. El primer que escrigui triara primer.

***************

Wow! ok so, 5 7 it is! Sorry for those who haven’t got here earlier! It would be quite a bit on postage if I made smaller sets, I hope you understand… I’m going to contact those I have selected and let you know what’s available. 

15 Comments

Filed under COSTURA- SEWING, EMBROIDERY, PATCHWORK

Happy Paddy’s Day!

IMG_6187


Isn’t this fabric great?

Sure we’ll be playing a good few tunes today,

Happy St.Patrick’s Day to you all!

15 Comments

Filed under fabric, St Patrick's Day

WINNER!

Thank you all so much for participating! I had visitors from every spot in the world!

Gracies a totes per participar! hi ha hagut visites des de tots els racons del mon!

The winner is:

La guanyadora es:

Captura de pantalla 2013-03-16 a les 12.04.50


who said:Captura de pantalla 2013-03-16 a les 12.13.11


Kim blogs over at Quilty DooDads, you’ll see amazing piecing there so go and have a look!

la Kim te aquest bloc , Quilty DooDads, on podeu veure patchwork precios, feu-hi una ullda!


I’m hosting a special giveaway soon again, so please do come back!

Aviat hi haura un altre sorteig molt especial!


2 Comments

Filed under Uncategorized

Finishing UFO’s

It took me a while to figure out all those acronyms in the quilting world. Now I’m getting used to them… UFO, UnFinishedObject…

Well, this is a quilt I started about 6 months ago, using a jelly roll that someone gave me about… 2 years ago??? Then, about… a year ago I bought this book, Jelly Roll Inspirations, and I chose this pattern:

IMG_6139

Hi ha molts acromins en el mon del partchwork blocaire, i aquest “UFO” es refereix a  Un Finished Objects, objectes no acabats… Doncs tinc un quilt que vaig començar a fer fa uns sis mesos, amb un jelly roll que em van donar fara… uns dos anys??? i fa cosa d’un any vaig comprar aquest llibre:  Jelly Roll Inspirations, i vaig escollir aquest projecte que veieu a la foto de dalt.

IMG_6041

I have changed a bit the display of the blocks, and why not confess that I made a mistake while cutting a block from the 5 sewn strips. That resulted in trying to find 5 other strips that coordinated with the rest of the roll and start again… so from then on, the pattern was modified a bit, by accident. Hana was helping me to arrange the triangles before sewing them into blocks, just so we could have a quick peek at how it would look.

IMG_6036

He canviat la posicio dels blocs i per que no confessar que em vaig equivocar al tallar uns quants blocs de les 5 tires que has de cosir. Aixo em va fer buscar 5 altres tires que coordinessin amb la resta del roll i des d’aqui que el patro ja v anar modificant, per accident. La Hana em va ajudar a organitzar una mica els triangles per veure com quedaria.

IMG_6039

Once all blocks were sewn, I arranged them randomly like this to have another look. So the next step now is to sew  them together. It has quite a traditional look with this fabric, so I’m thinking of the quilting and I’d like to try the knot tying technique. I found this tutorial which I might follow. But I wonder, have any of you tried tying a quilt? do you know a good tutorial? any tips that you could share? I have no idea about what kind thread/needle are the best…

IMG_6046

Un cop cosits tots en blocks, els vaig posar junts i aqui estan. Ara els he de cosir i acabar el top. Te un look molt tradicional amb aquestes teles i estic pensant de com fare l’encoixinat de lligar nusos. Vaig trobar aquest tutorial i crec que el seguire. Algu de vosaltres a probat mai de fer un encoixinat aixi? no tinc ni idea de quin es el fil  mes adient o quin tipus d’agulla, pero ja ho esbrinare…

7 Comments

Filed under COSTURA- SEWING, PATCHWORK

New Stitches

IMG_6026I used to cross stitch a looooooong time ago… I think it’s the second thing my mum taught me craftwise, knitting was the first. I made a good few cross stitched projects, but the only one I took with me when I came to live in Ireland was this one. I like it, three colours only, on linen. I think I got the pattern from one of my mum’s Burda magazines, hence the German…

Fa moooolt de temps que ja no faig res de punt de creu, pero es una de les primeres cose que la meva mare em va ensenyar, a part de fer punt. He fet bastantes coses en punt de creu, pero l’unica que vaig portar aqui a Irlanda es aquest quadre fet sobre tela de lli, en tres colors. Crec que vaig treure el patro d’una de les revista de Burda de la meva mare, per aixo esta en alemany…

IMG_6027

I always hand sew everything up until 5 years ago when I started to learn how to use a sewing machine, so the only stitches I know well are the backstitch, cross stitch, chain … Oh yes, and the runner stitch for hand quilting! Actually, now that I’m thinking of I also know the blanket stitch…so that’s not too bad after all.

Anyway, it hasn’t been until recently though that I’m admiring hand embroidery, especially when Natalie from SEWING ROOM SECRETS popped in here one day and I discovered her newborn blog. She makes these cute things, mixing embroidery with appliqué, just look at this, this and this, and she’s also a quilter!

Then I saw this project she’s working on, from Lilipopo‘s lovely patterns (which you can find in here).

So now I’m definitely trying some embroidery, who wouldn’t after seeing all this! Natalie was very good at leading me to Sarah’s Hand Embroidery Tutorials where you can find AMAZING tutorials for all kinds of stitches. So I took a hoop and started trying all the stitches that Sarah teaches in her site. What about you? do you cross stitch or do embroidery? Would you show me your work by adding the link in a comment? thank you!

I’ll show you what I’ve done so far…

IMG_6002

The fern stitch on dark red and the algerian eye stitch in yellow.

IMG_6003

The ray stitch in light green and the fan stitch in purple. Above I made a border with an interlaced running stitch, combining three colours.

Sempre he cosit tot a ma fins fa 5 anys quan vaig aprendre a cosir a maquina. Nomes se uns quants  punts, el recte, el de festo, el de creu i el de cadeneta. No esta tan malament…

Fa unes setmanes vaig descobrir el blog d’una nova seguidora, la Natalie, de SEWING ROOM SECRETS, i ultimament estic admirant els brodats que fa. Mireu aixo, aixo i aixo, i a mes fa patchwork tambe!  Pero aleshores, vaig veure aquest projecte que esta fent ara, d’un patro de la Lilipopo on podeu trobar-ne mes aqui. I be, despres de veure aixo… doncs ho vull probar! La Natalie em va dirigir cap aquesta web, on pots trobar tutorials de tots els punts imaginables! Aixi que he agafat l’aro de brodar (o com se digui!!!) i he decidit probar tots els punts de la web. De moment he fet aixo. No traduire els punts perque no tinc ni idea de com es deuen dir en catala…ho sento! Ja anire ensenyant el meu progres a mida que vagi fent.

I vosaltres? feu punt de creu  o brodats? voleu ensenyar el que feu? deixeu un comentari amb l’enllaç per que ho pugui veure! gracies!

IMG_6004

These are not very well made diamond eyelets…

IMG_6006

The one on the left is a mistake, but it turned out to be a lovely pattern! I wanted to make the stepped running stitch but I didn’t realize I had to alternate the running stitches. The one on the right is a variety of the parallel running stitch.

IMG_6005

So I added a line of running stitches to alternate with the red ones, but then the stepped running stitch wasn’t working that well because it needs a wider space between the two lines…

IMG_6007

On the left there’s a variety of the parallel running stitch and on the right the whipped running stitch.

I’ll show you more next week!

6 Comments

Filed under BRODATS, EMBROIDERY

BLOG HOP PARTY GIVEAWAY

new-quilting-gallery-logo

Hello and welcome to my blog! Here I share a bit of everything like quilting, sewing, quilling, baking and some nice TUTORIALS.

Yes! It’s this time of the year again! The Quilting Gallery is hosting the Blog Hop Party to “Beat the Winter Blues” with lots of giveaways from many bloggers from around the world. Scroll down to find out what I’m giving away and what you need to do for a chance to win and then click on the image below to be directed to the main page where you can find the list of all participants to keep hopping around. Have fun  and good luck!

beat-the-winter-blues

Torna a ser el moment del sorteig que organitza The Quilting Gallery amb el Blog Hop Party. Llegiu mes avall per saber que es el que sortejo i que heu de fer per participar i despres cliqueu a la imatge d’aqui amunt per redirigir-vos al llistat de totes les participants d’arreu del mon i poder entrar a mes sortejos. Sort!

What am I giving away this time? This Buttercup handbag, made with Cloud 9 organic cotton. I’m including one FQ of the same line and some good size scraps. All in blue… to beat the blues and show this beautiful colour off!

IMG_6008

You can see more photos and a full description of a bag like this one HERE. If you are not the winner or simply can’t wait and would like one, you can purchase/custom order it in my Etsy shop with a 15% discount by using the code BLOGHOP up until the 15th of March.

IMG_6009

Sortejo aquesta bossa,  la bossa Buttercup, feta amb tela de coto organic de Cloud 9. Tambe afegire un FQ de la mateixa linia i uns retalls. Tot en tons blaus.

IMG_6010

Per poder veure mes fotos i descripcio d’aquesta bossa cliqueu AQUI. Si no guanyeu o simplement no podeu esperar i voleu un bossa com aquesta, la podeu comprar/encarregar a la meva botiga Etsy amb un 15% de descompte fent servir el codi BLOGHOP fins el 15 de Març.

IMG_6011

RULES

1. Follow my blog via email (by clicking on the top right box on my sidebar – where it says “of course not!”) and then leave a comment telling me from which city/town/village you are following me from (I like virtual traveling!). If you already follow me, remind me where you are!

2. For a second OPTIONAL chance you can LIKE my Facebook Page, and write a comment here letting me know you did, so I can count it as your second entry. If you already like it, just tell me so in your comment.

3. For a third OPTIONAL chance, spread the word and share this giveaway on your blog, Facebook page, or any social media you use. Again, leave a comment linking it so your entry can be counted.

– This giveaway will run until March 15th at 12pm (Irish time).

– International entries more than welcome!!!

– I’ll announce the winner here and email them to let them know, so please please please, make sure I have a way to contact you!!! Otherwise I’ll have to draw another winner.

– I normally reply to reader’s messages on the same post, I won’t be doing it here so I don’t mess up the counting! Thank you all  so much for stopping by and taking the time to comment, good luck!

REGLES:

1. Feu-vos seguidors d’aquest blog per via email (a dalt de tot de la barra de la dreta), i despres escriviu-me un comentari dient-me des de quina ciutat/poble em llegiu (m’agrada viatjar virtualment). Si ja en sou de seguidors, recordeu-me on sou!

2. OPCIONAL: Cliqueu “m’agrada” a la meva pagina de Facebook i escriviu un comentari en aquest post dient-me que ho heu fet per a que pugui comptar-lo com a segona entrada. Si ja us agrada, simplement em dieu que ja ho feu.

3. OPCIONAL: Feu correr la veu sobre aquest sorteig enllaçant-lo al vostre blog, Facebook o el que sigui que feu servir i torneu a escriure un comentari enllaçant-me’l per a poder comptar-lo.

– Aquest sorteig s’acabara el 15 de Març a les 12pm hora irlandesa.

– Entrades internacionals mes que benvingudes!!!

– Anunciare el guanyador aqui i per email, aixi que si us plau no oblideu d’escriure la vostra adreça de correu electronic per a poder contactar-vos.

– Normalment contesto als comentaris dins del mateix post, pero aquest cop no ho fare per no embolicar la troca quan hagi de comptar-los. Moltissimes gracies per passar per aqui, comentar i decidir seguir-me. Molta sort!

162 Comments

Filed under GIVEAWAYS - SORTEIG

The Wrapped Up Zipper Bag (or Origami Pouch…): Tutorial

IMG_5991

I just realised there already was a zipper pouch (one of maaaaaany) that used the name Origami, you’ll find it in Amy Butler’s book Styles Stitches. I wasn’t aware of that so I think I should find a nother name for this zipper bag… It reminds me of a wrapped up present, so Ithink I’ll call it the Wrapped Up Zipper Bag, even though it involves some Origami folding!

If you like Origami and are good at it then you won’t have any problem with this… If you are not good at folding, don’t worry, I’ll teach you how to do it!

Si us agrada l’Origami i domineu la tecnica no tindreu pas problema per fer un estoig com aquest… Pero si no teniu gaire practica, no us preocupeu que ja us ensenyo com es fa!

IMG_5959

You can choose whatever size you want, just make sure that your zipper is 2″ longer on either side to make your life easier.

Podeu fer-la de la mida que volgueu, nomes heu de tenir en compte de fer servir una cremallera que sigui 5cm mes llarga a cada extrem per no complicar-vos la vida.

IMG_5903

For the flowery type box:

15″x10″rectangles of outer fabric and lining fabric

100% cotton wadding for quilting the 2 layers

5″x4″ rectangle of outer fabric

2 rectangles of 3″x4″ of outer fabric or any contrasting fabric with the lining

14″ zipper

Per un estoig com el de les flors:

rectangle 25cm x 35cm de de tela exterior

rectangle  25cm x 35cm de tela interior

guata de 100%coto per encoixinar els dos rectangles anteriors

rectangle de 12cm x 10cm

2 rectangles de 7.5cm x 10cm de tela exterior o que contrasti amb la interior

cremallera de 35cm

IMG_5962

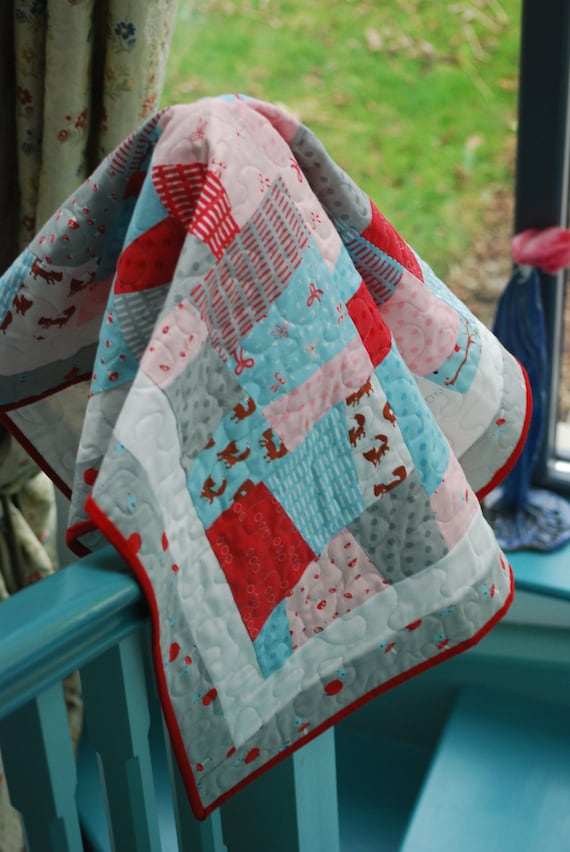
For the linen type pouch:

11″x10.5″ rectangle of exterior fabric (you can see I used a patchwork panel)

11″x10.5″ rectangle of interior fabric

fusible fleece to quilt both rectangles

5″x4″ rectangle of outer fabric

2 rectangles of 2.5″x4″ of outer fabric or any contrasting fabric with the lining

Per un estoig com el de lli :

rectangle 25cm x 35cm de de tela exterior

rectangle  25cm x 35cm de tela interior

Entretela tipus forro polar per encoixinar els dos rectangles anteriors

rectangle de 12cm x 10cm

2 rectangles de 6cm x 10cm de tela exterior o que contrasti amb la interior

cremallera de 35cm

The process will be the same in any size, I’ve used photos from both pouches for the tutorial.

El proces es el mateix per a qualsevol mida, veureu que hi ha fotos dels dos estoigs en aquest tutorial

IMG_5963

1. Sew one side of the zipper on to the 10″ side of the rectangle, FACING DOWN at 1/8″ from the edge.

1. Cosiu un costat de la cremallera CARA AVALL a 0.5mm del costat de 25cm del rectangle. 

IMG_5966

2. Trim the excess fabric with shears.

2. Talleu l’exces de tela amb unes tisores zigzag.

IMG_5967

3. Press onto the right side and topstitch.

3. Planxeu a la banda del dret i cosiu un repunt.

IMG_5923

4. Mark the zipper with a pen at the point where both edges end.

4. Marqueu la cremallera amb boligraf alla on la tela acaba.

IMG_5968

5. Sew the other side of the zipper by folding the rectangle over (zipper FACING DOWN onto RIGHT SIDE of fabric).

5. Cosiu l’altre costat de la cremallera, doblegant el rectangle de manera que la cremallera mira cap AVALL sobre la tela del DRET). 

IMG_5969

6. Cut the excess fabric again and this time you will need to fully open the zipper to press and topstitch.

6. Talleu l’exces de tela i aquest cop haure d’obrir la cremallera per a poder planxar i fer el repunt.

IMG_5970

IMG_5971

7. Stich the bottom edge of the zipper

7. Feu unes puntades a la part d’abaix de la cremallera.

IMG_5972
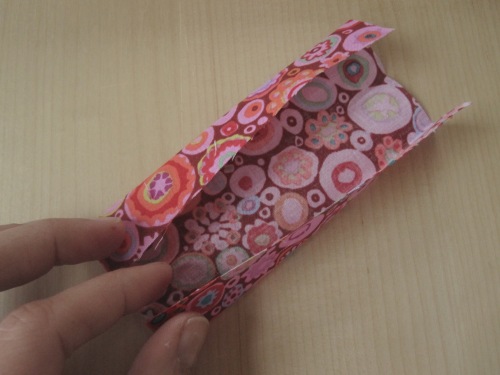
8. Take the small rectangle and press in half, then press both edges inwards towards the centre crease.

8. Agafeu el rectanlge petit i planxeu-lo per la meitat, torneu a planxar els extrems cap al doblec del centre.

IMG_5973

IMG_59749. Sew both edges and sew a tag if you use one.

9. Cosiu els costats i cosiu-hi la vostra etiqueta si voleu.

IMG_597510. Right, now for the Origami session… Turn the pouch inside out and fold it flat with the zipper at the centre.

10. Be, ara comencem amb l’Origami… Gireu l’estoig del reves i el xafeu de manera que la cremallera quedi al centre.

IMG_5976

11. Use a pin to mark the centre

11. Col.loqueu una agulla per marcar el centre

IMG_5978

12. Tuck in the edge towards the centre where the pin is. Excuse all the frayed threads!!!

12. Col.loqueu el doblec exterior cap endins cap a l’agulla. Perdoneu per els fils desfilats!

IMG_5980

13. Do the same on the other side and repeat these last steps for the other edge of the pouch.

13. Feu el mateix amb l’altre costat i repetiu els dos ultims punts amb l’altre extrem de l’estoig.

IMG_5981

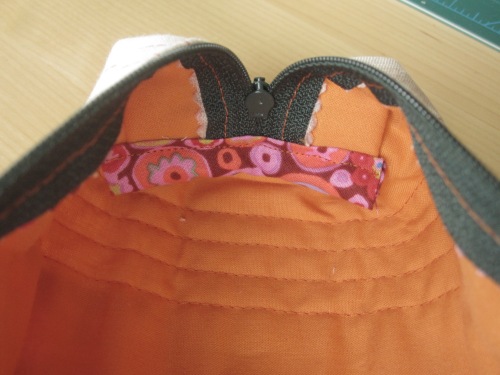
15. Place the tag strip into one edge.

15. Col.loqueu la tira de l’etiqueta dins d’un extrem.

IMG_5985

16. OPEN THE ZIPPER before you sew both edges.

16. OBRIU LA CREMALLERA abans de cosir cada extrem.

IMG_598617. Trim the excess fabric and the zipper.

17. Talleu l’exces de tela i de cremallera.

IMG_5949

18. With the 2 small rectangles left, make a binding for each seam by following the instructions in step 8.

18. Amb els dos rectangles petits que us queden feu una veta per cobrir les costures dels extrems seguint les instruccions del punt 8.

IMG_5987

IMG_5990

20. Turn de pouch and you’re done! I hope you’ve enjoyed this tutorial. I’d love to see your pouch if you make one so feel free to come back and share your link in a comment below. Thank you!

20. Gireu l’estoig del dret i ja el teniu fet! Espero que us hagi agradat. Magradaria veure el vostre estoig si en feu un, podeu compartir l’enllaç en un comentari per a que tots el veiem. Gracies!

IMG_5988

IMG_5992

IMG_5993

IMG_5959

IMG_5995


18 Comments

Filed under COSTURA- SEWING, TUTORIALS