Monthly Archives: July 2016

Disappearing 9 Patch Block

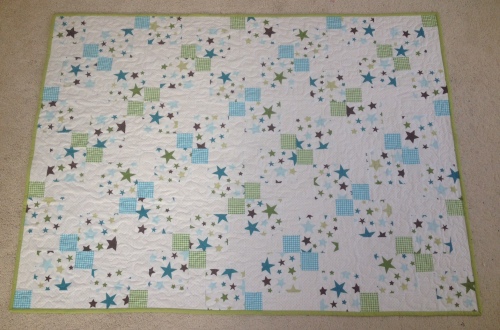
I recently finished two quilts using a very easy block, a classic: the Disappearing 9 Patch. I think it is the first block I ever made…. and one of my favourite ones because it is great for beginners and is very versatile. If you choose your fabric carefully you can end up with endless colour and print combinations with great results for the final pieced top.

FullSizeRender-1

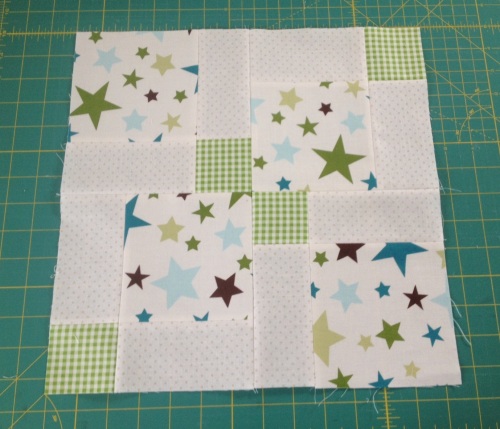
For this block I used 3 different prints:

  1. One print for the central square. This will become 4 little squares.
  2. A second print for the squares in the corners, which will remain the same size.
  3. The third print for the squares at central top and bottom, left and right, will become rectangles.

1FullSizeRender-3

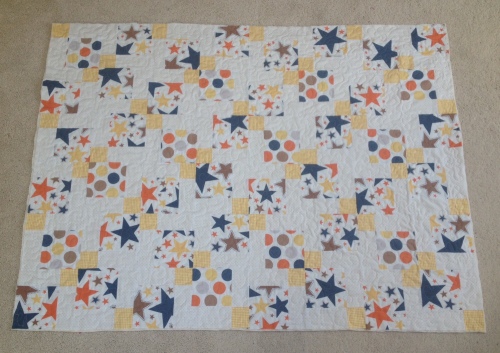
Knowing this, you can anticipate the look of your final quilt.

For a scrappy look, you can use lots of different fabrics or combine random prints for all the squares except for example the ones in the centre… There are lots of different ways to play with the fabric combinations in this block.

Here are a few tips for making a perfect Disappearing-9-Patch block:

  1. Make sure you use starch when pressing your fabric before you cut it into squares. It helps to set the woven threads and the cut squares will keep their shape longer before you sew them together.
  1. Always pin your fabric to prevent it from moving while you sew and stick to your ¼” seam. When aligning your squares together, start pinning at the centre and move towards both sides.
  1. Press the line of stitches after sewing, while right sides of fabric are still together, to set them flat and then press the seams open. I always press my seams open, I find they help the pieced top lay flat more nicely.
  1. Just PRESS, and DO NOT IRON. Pressing means to lay your hot iron onto the fabric for a few seconds without moving it back and forth. Ironing means the opposite, moving the iron all over the fabric, this is ok for clothes, but not for patchwork, otherwise the grain will move and the pieces will loose their shape.
  1. When you are ready to sew one row of 3 squares onto the row below, align the edges while making sure that you match the seams (which are pressed open) between the squares, and pin together these seams first (again start at the centre and work your way towards both sides). Placing the pin on the left seam (this way ensures that when you are sewing the two pieces the seam at the bottom won’t flip over.

7FullSizeRender-7


8FullSizeRender

When you have the basic 9 patch block ready, with all corners perfectly matched, you can cut the block into quarters

Cut vertically right on the middle.

Next, cut the block horizontally (You can move your cutting mat or walk around your table instead and it will be easier to cut vertically again).

2FullSizeRender-2

Now you can also play with the layout of the quarters of this block and arrange them in different combinations.

3FullSizeRender-1

I chose to turn two opposite quarters and place the tiny squares to the outside corners. But you could turn around all four of them or one or three… Just experiment and see what you like.

Here’s another combination:

6FullSizeRender-9

Once you decide how to arrange the quarters, sew them together. Follow the same method as before, by matching the seams, pin them together to avoid unwanted twists and press them open (I need to press those opened seams a bit more!:-D)

9FullSizeRender-610FullSizeRender-11

You will have the Disappearing 9 Patch with perfect matching corners lying nice and flat.

It is handy to use precut squares like a charm pack (5” squares) or just cut them into whatever size you need. I have build up a big stash of 5” squares over the years out of leftovers and generally use them for projects like this.

IMG_0912

When using 5” squares the final size of the basic 9-patch block is 14.5” and the disappearing 9-patch will be then 14”.

FullSizeRender-2

I’m sure many of you have made this block before, I’d love to see what it looks like. Feel free to link it in a message if you like!

Thanks for reading !


9 Comments

Filed under COSTURA- SEWING, PATCHWORK, quilting, TUTORIALS

It’s all about Bib… and a Giveaway!

giveway036.JPG

Yeah! Sunday is here and that means I can tell you all about the exciting news I have!

Visit BABYLEDBLOG to find a review for my Superbibs and the chance to win one of them. You will also find a discount code to avail of 10% off if you decide to purchase a bib on my shop here.

Dexterbib.jpg

(photo courtesy of BabyLedBlog)

This beautiful boy is modelling a dinosaur print, one of my favourite prints I bought while I was visiting Barcelona not long ago… You will find more prints for boys, girls and gender neutral in my shop… And the stock is growing…

Good luck!

Leave a comment

Filed under COSTURA- SEWING, Etsy, GIVEAWAYS - SORTEIG

May, June, July…What!!!???

Wow… Yes, July already and almost gone…! Ok, so I owe some shares from May and June… Here we go so:


I made my first Sewtogether Bag! I love this bag so much, everything I need and more fits perfectly in it. My daughter was so jealous I had to make one for her too, in one evening!!! I purchased the pattern by Sew Demented on Craftsy, but I followed the Sew Along tutorial from The Quilt Barn. I really recommend to follow her tutorial, it makes it really easy. Some bits were quite tricky, but just make sure you have plenty of time, no interruptions and tons of patience and perseverance… It’s worth it!


IMG_9928

I also made a quilt for a customer. It was ordered for a friend. I really like how it turned out. I loved when my customer was giving me some input as well as free rein on the design. She wanted squares, and the fabric choice was very specific because it had to carry a lot of meaning.

There are some embroidery bits like the name of places where the family lived under the squares with house prints, and other names of places that mark important events in their life. I also quilted the names of their four children among the steepled quilting design, so they are quite camouflaged and keeps all that information quite private and unnoticed.

And finally, I made lots and lots of Superbibs! I received the loveliest feedback ever and I felt so thrilled! It was so nice to read this:

Hello there, I just wanted to drop a quick message to you to say that 2 years on we are still using your beautiful bibs! We bought 4 when my little girl was 6 months old, she is now 2 1/2 and still wears them. They are still in fantastic condition, despite being worn 3 times a day every day 🙂 And they still fit her, which I can’t believe. What a wonderful product they are that you make, and I hope you continue to make them. Best wishes, C. x

I love purchasing fabric for making these bibs, there are so  many cute prints! I try to have a good selection of neutral, colourful ones, as well as boyish and girlish ones.

I am still making a more and they are all being listed in my Etsy shop.

The good news is that if you would like to get one for your little one, or a little one that you know, you will  soon have the chance to enter a giveaway to win it. If you follow me on Instagram (you’ll find me under @elpetittalleretsy) you might have seen already some hints about this. Well, I’m inviting you to pop over to Faye’s blog, BabyLedBlog, where you will learn about great recipes and food related tips for babies and toddlers and their mamas and papas and wait for an interesting post this week about the Superbib.

Come back to check or follow me on Instagram and Facebook for updates!


7 Comments

Filed under COSTURA- SEWING, FAMILY, GIVEAWAYS - SORTEIG, PATCHWORK, quilting