Disappearing 9 Patch Block

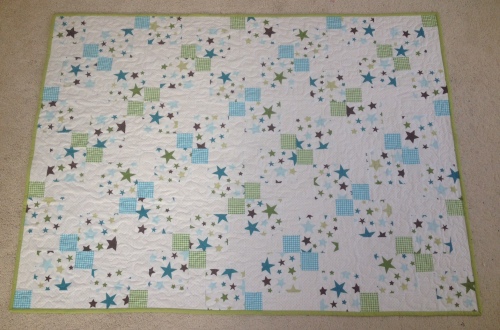
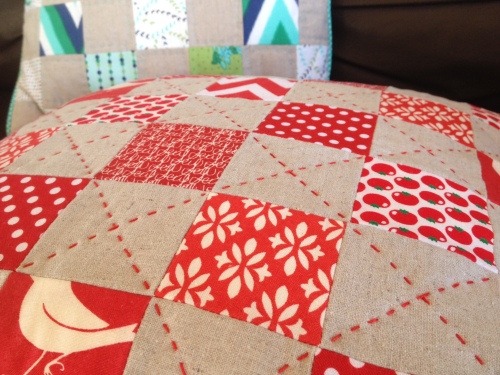
I recently finished two quilts using a very easy block, a classic: the Disappearing 9 Patch. I think it is the first block I ever made…. and one of my favourite ones because it is great for beginners and is very versatile. If you choose your fabric carefully you can end up with endless colour and print combinations with great results for the final pieced top.

FullSizeRender-1

For this block I used 3 different prints:

  1. One print for the central square. This will become 4 little squares.
  2. A second print for the squares in the corners, which will remain the same size.
  3. The third print for the squares at central top and bottom, left and right, will become rectangles.

1FullSizeRender-3

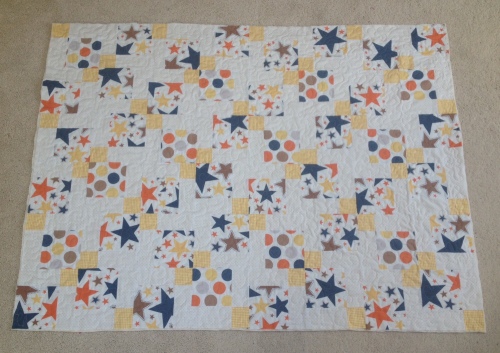
Knowing this, you can anticipate the look of your final quilt.

For a scrappy look, you can use lots of different fabrics or combine random prints for all the squares except for example the ones in the centre… There are lots of different ways to play with the fabric combinations in this block.

Here are a few tips for making a perfect Disappearing-9-Patch block:

  1. Make sure you use starch when pressing your fabric before you cut it into squares. It helps to set the woven threads and the cut squares will keep their shape longer before you sew them together.
  1. Always pin your fabric to prevent it from moving while you sew and stick to your ¼” seam. When aligning your squares together, start pinning at the centre and move towards both sides.
  1. Press the line of stitches after sewing, while right sides of fabric are still together, to set them flat and then press the seams open. I always press my seams open, I find they help the pieced top lay flat more nicely.
  1. Just PRESS, and DO NOT IRON. Pressing means to lay your hot iron onto the fabric for a few seconds without moving it back and forth. Ironing means the opposite, moving the iron all over the fabric, this is ok for clothes, but not for patchwork, otherwise the grain will move and the pieces will loose their shape.
  1. When you are ready to sew one row of 3 squares onto the row below, align the edges while making sure that you match the seams (which are pressed open) between the squares, and pin together these seams first (again start at the centre and work your way towards both sides). Placing the pin on the left seam (this way ensures that when you are sewing the two pieces the seam at the bottom won’t flip over.

7FullSizeRender-7


8FullSizeRender

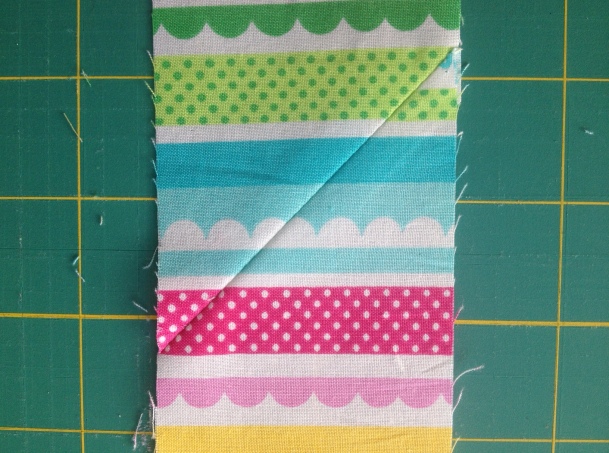
When you have the basic 9 patch block ready, with all corners perfectly matched, you can cut the block into quarters

Cut vertically right on the middle.

Next, cut the block horizontally (You can move your cutting mat or walk around your table instead and it will be easier to cut vertically again).

2FullSizeRender-2

Now you can also play with the layout of the quarters of this block and arrange them in different combinations.

3FullSizeRender-1

I chose to turn two opposite quarters and place the tiny squares to the outside corners. But you could turn around all four of them or one or three… Just experiment and see what you like.

Here’s another combination:

6FullSizeRender-9

Once you decide how to arrange the quarters, sew them together. Follow the same method as before, by matching the seams, pin them together to avoid unwanted twists and press them open (I need to press those opened seams a bit more!:-D)

9FullSizeRender-610FullSizeRender-11

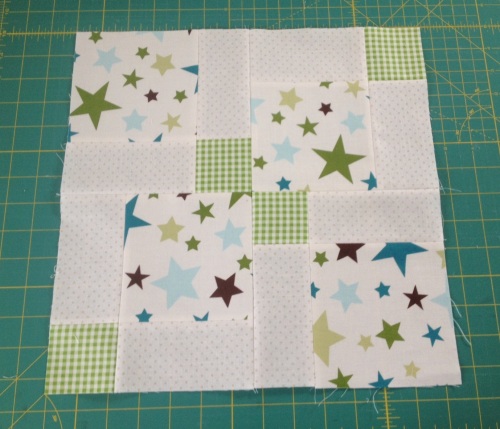
You will have the Disappearing 9 Patch with perfect matching corners lying nice and flat.

It is handy to use precut squares like a charm pack (5” squares) or just cut them into whatever size you need. I have build up a big stash of 5” squares over the years out of leftovers and generally use them for projects like this.

IMG_0912

When using 5” squares the final size of the basic 9-patch block is 14.5” and the disappearing 9-patch will be then 14”.

FullSizeRender-2

I’m sure many of you have made this block before, I’d love to see what it looks like. Feel free to link it in a message if you like!

Thanks for reading !


9 Comments

Filed under COSTURA- SEWING, PATCHWORK, quilting, TUTORIALS

It’s all about Bib… and a Giveaway!

giveway036.JPG

Yeah! Sunday is here and that means I can tell you all about the exciting news I have!

Visit BABYLEDBLOG to find a review for my Superbibs and the chance to win one of them. You will also find a discount code to avail of 10% off if you decide to purchase a bib on my shop here.

Dexterbib.jpg

(photo courtesy of BabyLedBlog)

This beautiful boy is modelling a dinosaur print, one of my favourite prints I bought while I was visiting Barcelona not long ago… You will find more prints for boys, girls and gender neutral in my shop… And the stock is growing…

Good luck!

Leave a comment

Filed under COSTURA- SEWING, Etsy, GIVEAWAYS - SORTEIG

May, June, July…What!!!???

Wow… Yes, July already and almost gone…! Ok, so I owe some shares from May and June… Here we go so:


I made my first Sewtogether Bag! I love this bag so much, everything I need and more fits perfectly in it. My daughter was so jealous I had to make one for her too, in one evening!!! I purchased the pattern by Sew Demented on Craftsy, but I followed the Sew Along tutorial from The Quilt Barn. I really recommend to follow her tutorial, it makes it really easy. Some bits were quite tricky, but just make sure you have plenty of time, no interruptions and tons of patience and perseverance… It’s worth it!


IMG_9928

I also made a quilt for a customer. It was ordered for a friend. I really like how it turned out. I loved when my customer was giving me some input as well as free rein on the design. She wanted squares, and the fabric choice was very specific because it had to carry a lot of meaning.

There are some embroidery bits like the name of places where the family lived under the squares with house prints, and other names of places that mark important events in their life. I also quilted the names of their four children among the steepled quilting design, so they are quite camouflaged and keeps all that information quite private and unnoticed.

And finally, I made lots and lots of Superbibs! I received the loveliest feedback ever and I felt so thrilled! It was so nice to read this:

Hello there, I just wanted to drop a quick message to you to say that 2 years on we are still using your beautiful bibs! We bought 4 when my little girl was 6 months old, she is now 2 1/2 and still wears them. They are still in fantastic condition, despite being worn 3 times a day every day 🙂 And they still fit her, which I can’t believe. What a wonderful product they are that you make, and I hope you continue to make them. Best wishes, C. x

I love purchasing fabric for making these bibs, there are so  many cute prints! I try to have a good selection of neutral, colourful ones, as well as boyish and girlish ones.

I am still making a more and they are all being listed in my Etsy shop.

The good news is that if you would like to get one for your little one, or a little one that you know, you will  soon have the chance to enter a giveaway to win it. If you follow me on Instagram (you’ll find me under @elpetittalleretsy) you might have seen already some hints about this. Well, I’m inviting you to pop over to Faye’s blog, BabyLedBlog, where you will learn about great recipes and food related tips for babies and toddlers and their mamas and papas and wait for an interesting post this week about the Superbib.

Come back to check or follow me on Instagram and Facebook for updates!


7 Comments

Filed under COSTURA- SEWING, FAMILY, GIVEAWAYS - SORTEIG, PATCHWORK, quilting

Quilt Labels Tutorial

Do you use labels for your finished quilts?

When I finished my first proper quilt, the lady who gave me my first quilting lesson told me I should label all my quilts, so dutifully I did and bought a pack of 3 or 4 sheets of printable fabric. These are A4 sized white cotton fabric glued to a sheet of paper. You can  load them on your printer to print your labels.

A friend told me that I could actually make them with freezer paper. I asked my husband to buy me a roll from the US during one of his work trips and I still have most of it left. I did try and with a bit of skill, it works. Here’s how I did it.

You will need:

Freezer paper

cotton fabric (I use calico cotton)

scissors

a stick of glue (for general paper crafts)

a printer (mine is a HP deskjet)

an iron

labeltute1

1. First you need to design your label on a word processor, you can add your logo and be as creative as you want.

2. Cut a piece of fabric the same size of an A4 sheet or slightly smaller and do the same with the freezer paper.

labeltute2

3. Prepare your iron by setting it a medium heat and press the freezer paper onto the fabric making sure that the glossy side is onto the fabric.

labeltute3

4. Press on the paper side and then on the fabric side to smooth it better.

This slideshow requires JavaScript.

5. Refine the size by cutting the edges with your ruler and rotary cutter.

labeltute6

Here’s a good tip: Sometimes I was able to load this sheet in the printer as it was and it went through perfectly fine. But other times it got stuck and created a PAPER JAM PAPER JAM…!!! This is easy to resolve by sticking the back (the freezer paper side) of your prepared sheet onto an A4 sheet of paper with a bit of glue. You only need to glue the bottom side, the one that starts to feed into the printer, to help it go through. This way it won’t get stuck and it will come out perfectly.

labeltute8

6. Make the most of  it by printing two or three labels at a time, depending on the size you want. You can then cut them with your ruler and rotary cutter, press the edges to the back and sew them onto your quilts.

FullSizeRender-2

I hope you find this useful!

Have you got any other tricks to make your own labels? I’d like to know if you do.


8 Comments

Filed under COSTURA- SEWING, fabric, PATCHWORK, quilting, TUTORIALS

Tutorial: Matching stripes on your stripy binding tape

Have you ever used stripes for binding a quilt?

I love stripes! and I think they work so well for finishing a quilt, if it’s not on its borders I would definitely use it for the binding if I can.

I am making a custom quilt at the moment and I have been taking a few snap shots in some of the stages so I can share a few tips. Here’s the first one: preparing your stripy binding tape.

I always make my binding tape when I am cutting all the fabric for the piecing, then I have it ready when the quilting is done. I love that stage, that moment when your quilt is nearly finished and you are looking forward to a couple of hours on the sofa and back in the company of your (neglected) family…

So here we go. After you cut all your strips (I always cut 2.5″ wide by WOF and here I am using Funfair Colour Strips by Stof).

Have a good look at how the stripes go. Choose the stripe that is completely full and closer to the edge (I am choosing the pink one with white dots on the vertical strip at the right of the photo)


FullSizeRender-4

Now place it onto the strip that lays horizontally, with right sides together (RST), and making sure that the horizontal top sideline of the pink stripe is aligned with the top edge of the bottom binding strip. You will see in the photo below that the edge of the strip on top is also aligned with the sideline of the vertical pink strip on the bottom.

(I don’t mind much about the perforated selvages because this won’t be seen when I sew the binding onto the quilt)

FullSizeRender-3

Pin the two strips in place to prevent them from moving and draw a line from the top left angle to the right bottom angle to use as a guide when you are sewing.


FullSizeRender

Sew along the line, backstitching at the start and the end and cut about 1/4″ along the seam.

FullSizeRender-2

Press the seam open and cut the excess tips on the sides.

IMG_9664

Now you have a continuous stripy binding tape with matching stripes!

FullSizeRender-6


STRIPYBINDING.jpg

Have you got any tips on stripy binding? Or maybe on how to make binding altogether? You might like to share them, just write in the comment box!

8 Comments

Filed under COSTURA- SEWING, PATCHWORK, TUTORIALS

Still here! Come and have a tour around my new sewing room

It’s been too long, way too long! I even considered closing this blog account, but oh no… how could I?  I’m back! 9 months later… and many things have changed. (pst…Scroll down to the bottom for a giveaway…)

First of all: we moved into a new home. Not very far from where we were but equally beautiful. We have absolutely stunning views from every single window (I think I will blog about it some day, when the sunny sun decides to come out for once!)

It is a smaller place than the one we had but I love it much more, the light in the kitchen is so beautiful and it warms up the whole house. It is just now with the gradually longer evenings that we are realizing how bright this place is. We moved in at the beginning of winter, and boy we’ve had a bad, cold, windy, rainy, stormy miserable winter…

Best of all: my sewing room! I think I have been very lucky to be able to have my own sewing space since I started to sew, here’s a post about my sewing room in my old home.

FullSizeRender.jpg
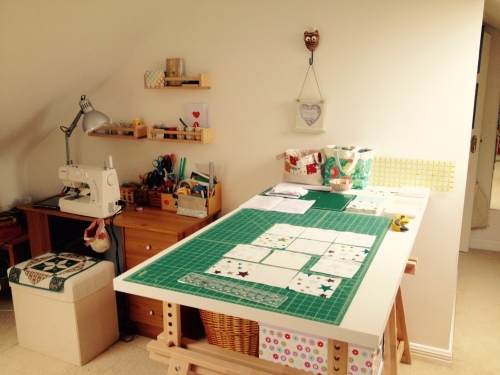
I have two Velux windows (windows on the roof) giving the perfect light for the whole room. One of them projects the light onto my worktop (that I recently got so I didn’t need to use a camping table any more!) which is great for taking good photos.

I still have to put up some pictures and decor on the walls, but it is looking pretty much the way I want it to be. I have to be careful with my head when I come in though, the roof is quite low (so low that the doors are cut on the top angle! Can you see it in the photo below?) and I still get the odd bump if I’m not paying attention… At least I can use the very low space to put my bookcases horizontally. FullSizeRender-6.jpg

I love my new work top. In my old place I was using our dinner table (as there was already a big marble table in the dining room that was impossible to move), but obviously being a dinner table it was not ideal for a worktop. Too low. And I had constant lower back pains. Ergonomics! So important!

FullSizeRender-1.jpgWith a bit of shuffling around, I could move the furniture I had and use it very well. As you can see, they could probably use this room for one of the Ikea catalogue pages! That’s what happens when there isn’t much of a choice for furniture shopping in your area. Most of it is donated and up-cycled. Good thing that almost everyone loves Ikea… I have lots of baskets that I get in charity shops, they look nice and are great for storing small items  and I can always use them as preps for my Christmas market stall.FullSizeRender-4.jpgI love the light from the other window above the futon… Sometimes the kids come up to stay with me (I do feel guilty many times, spending a long time upstairs completely forgetting about the time! I do need a clock on the wall) so they can sit down and watch a movie on my laptop, do some homework or play with a few toys.

You can see the dress I am working on at the moment. This is something I’m planning to blog about too (like in 9 months…? just joking – I hope). And of course, the Supernova Star quilt that some busy bees and I managed to create.FullSizeRender-2.jpg
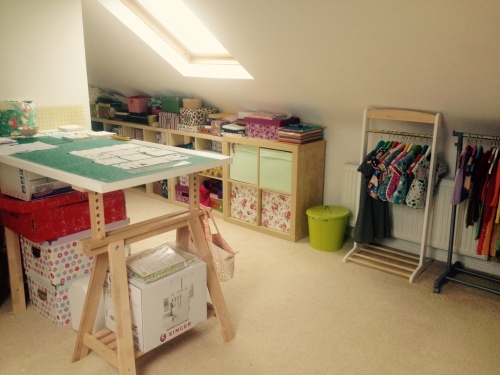
One thing I have mixed feelings about is the carpet. I do not like them. I am allergic to dust and I think they are not hygienic at all. But I did not have a choice. What annoys me most is that if I drop a pin, as it happens sometimes, I can’t hear it and it is hard to find too! Then my foot is the one finding it, and it’s not fun. But it is nice to walk bare feet on them. I am not allowing shoes upstairs anyway…FullSizeRender-3.jpgI’m using my old desk for the sewing machine, and I finally got my shelves up (yes, Ikea spice racks), which never had the fortune to be up in my old sewing room. It helps having the desk clear. The big wicker basket is where I keep all my wool and knitting stash. Lots of boxes under the work top, my serger (I got a new one! – will blog about it too) and my Brother sewing machine, which is taking a rest at the moment. I use an ottoman to store my wadding and it serves me as a seat too.FullSizeRender-5.jpgFinally, I have found a place for my ironing board that has it tucked in and out of the way when I’m not using it. I have a tiny travel iron that works perfectly when I only need to press seams when piecing. I still can’t believe I got it 5 years ago in a local shop for €1! When I need to press and iron big quilt tops I use my proper iron that I keep in one of the baskets when not in use. One thing I do really need is a new cover for the ironing board…

So this is it, pretty much. I have added a few things since these photos were taken.

I am working on 3 custom quilts at the moment and I have prepared 2 tutorials while I am working on them. Just useful tips to help a beginner. I am hoping to share more posts with useful information besides showing my WIPs and I also hope you readers are still here! Sorry it took me a very long time to come back!

By the way, I am now on Instagram! You can find me @ElPetitTallerEtsy (you won’t believe it but I’m still getting the hang of it…)

And… I am holding a giveaway on my Facebook page to celebrate Paddy’s Day! You are in for the chance to win one of my Irish Cottage pillows.


9 Comments

Filed under COSTURA- SEWING, GIVEAWAYS - SORTEIG, My Sewing Space, PATCHWORK, PHOTOGRAPHY

Blogger’s Quilt Festival!

Hello! My blog has been hibernating since my last post in December ( I am more active on Facebook and Etsy) so what better way to start spring blogging with the best quilt festival online !!! spring-2015-BQF-Button This is the quilt I am entering this time in the Original Design Category: IMG_7205 If you are new to my blog, you are very welcome! My name is Irina, I have been quilting, sewing, knitting ,quilling…you name it… for a few years and although this blog is not as active as I’d like to, I like writing about what’s going on in my sewing room. IMG_7209 FullSizeRender copy 6 The story behind this quilt starts over a year ago, when I decided to join my first quilting bee with the Modern Quilters Ireland. It was the Modern Scrappy Bee 2014 and we had to use, obviously, our scraps. I came up with a quilt design inspired by the photos of Supernova stars in space and a “confetti” quilt that I saw on Flickr, where bits of colour were scattered all over the quilt. For my bee purpose I needed to come up with a block that allowed it to be uniform, so everyone could follow the same instructions, but fulfilled the purpose of having a  bit of chaos in the bigger picture. I admit it is not an easy block, probably not the best for a bee group either, since there is lots of precise cutting involved, scant 1/4″ seams and well… lots of seams and pressing, really… photo 2 copy 5 I used graph paper to start my design. The block is divided in 4 quarters. The red scraps are cut into 1.5″ squares, so they become 1″ in the finished quilt. The white background pieces vary from 1″ finished squares to 8″x2″ finished rectangles. Each block has 60 pieces, and there are 24 blocks in total, so that’s 1,440 pieces in the whole quilt!!! I made 24 copies of the paper block and played with the arrangement. supernova project

block piecing

photo 4 copy 2 DSC_0747 IMG_7148 IMG_7206 
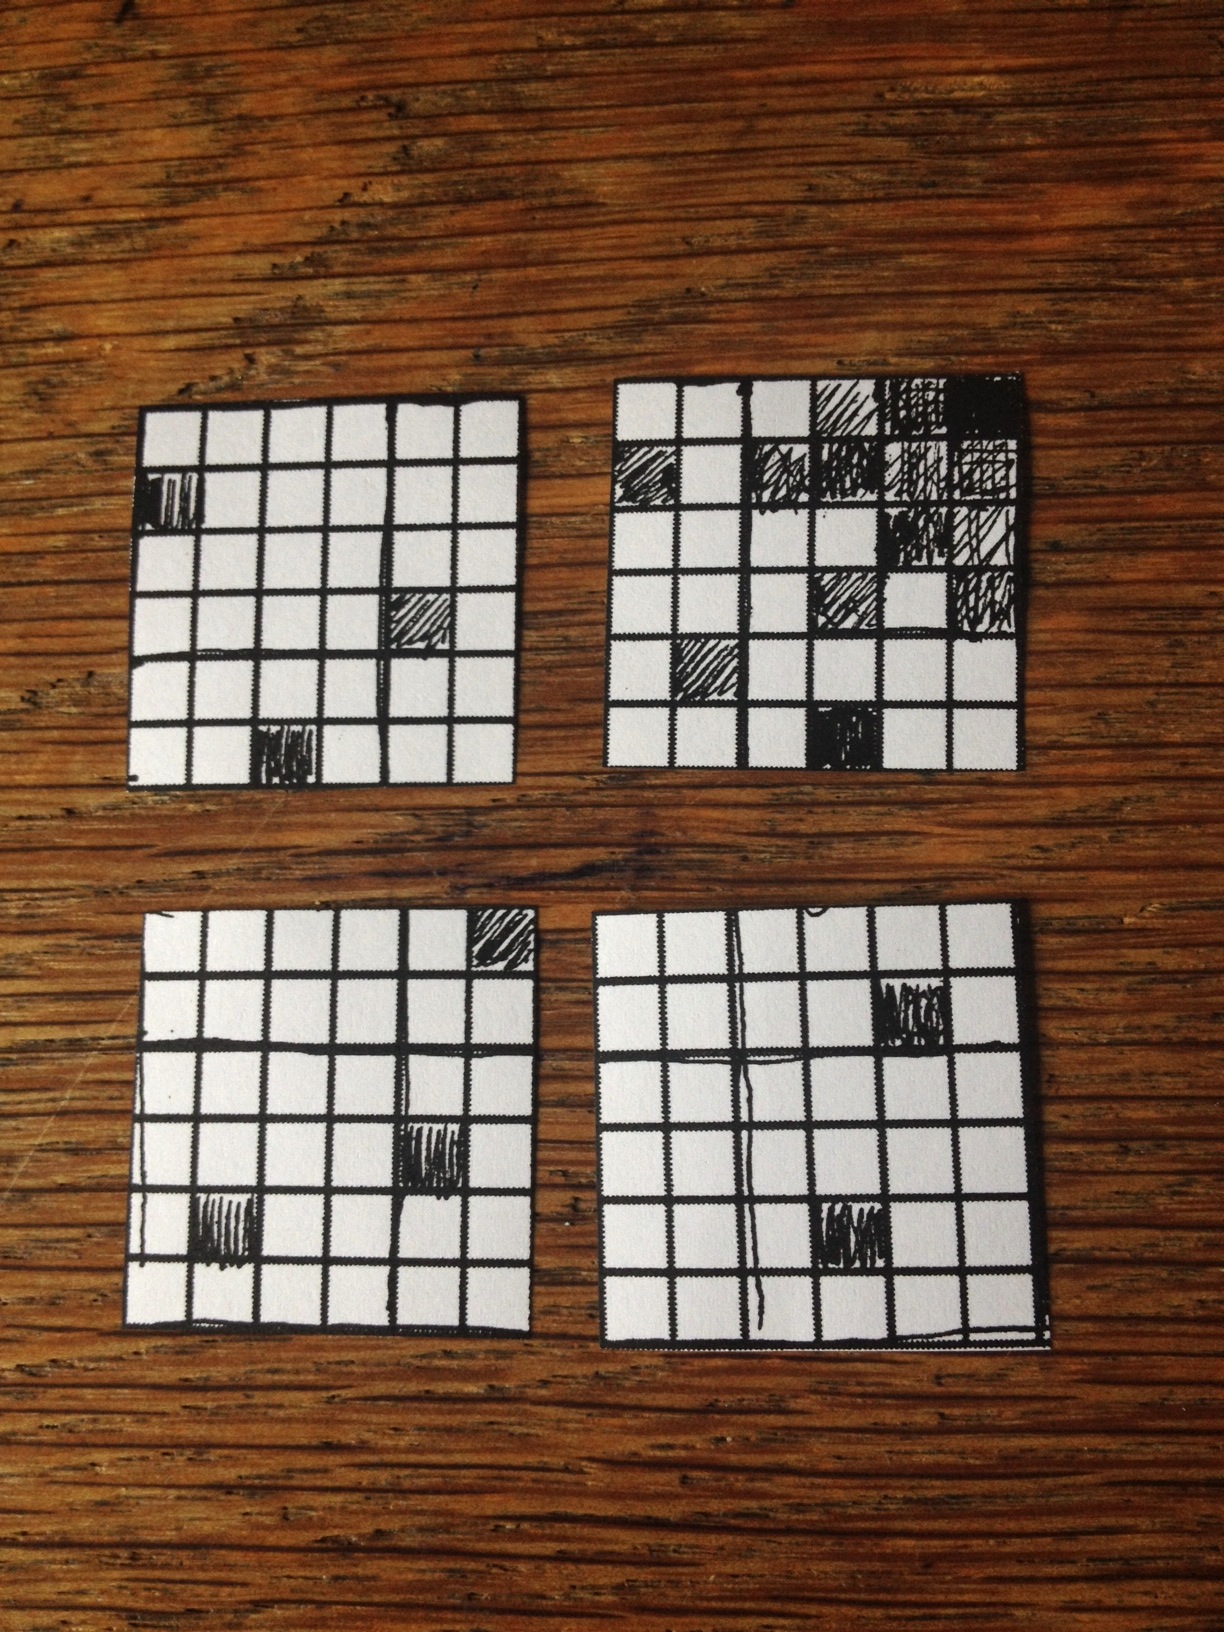
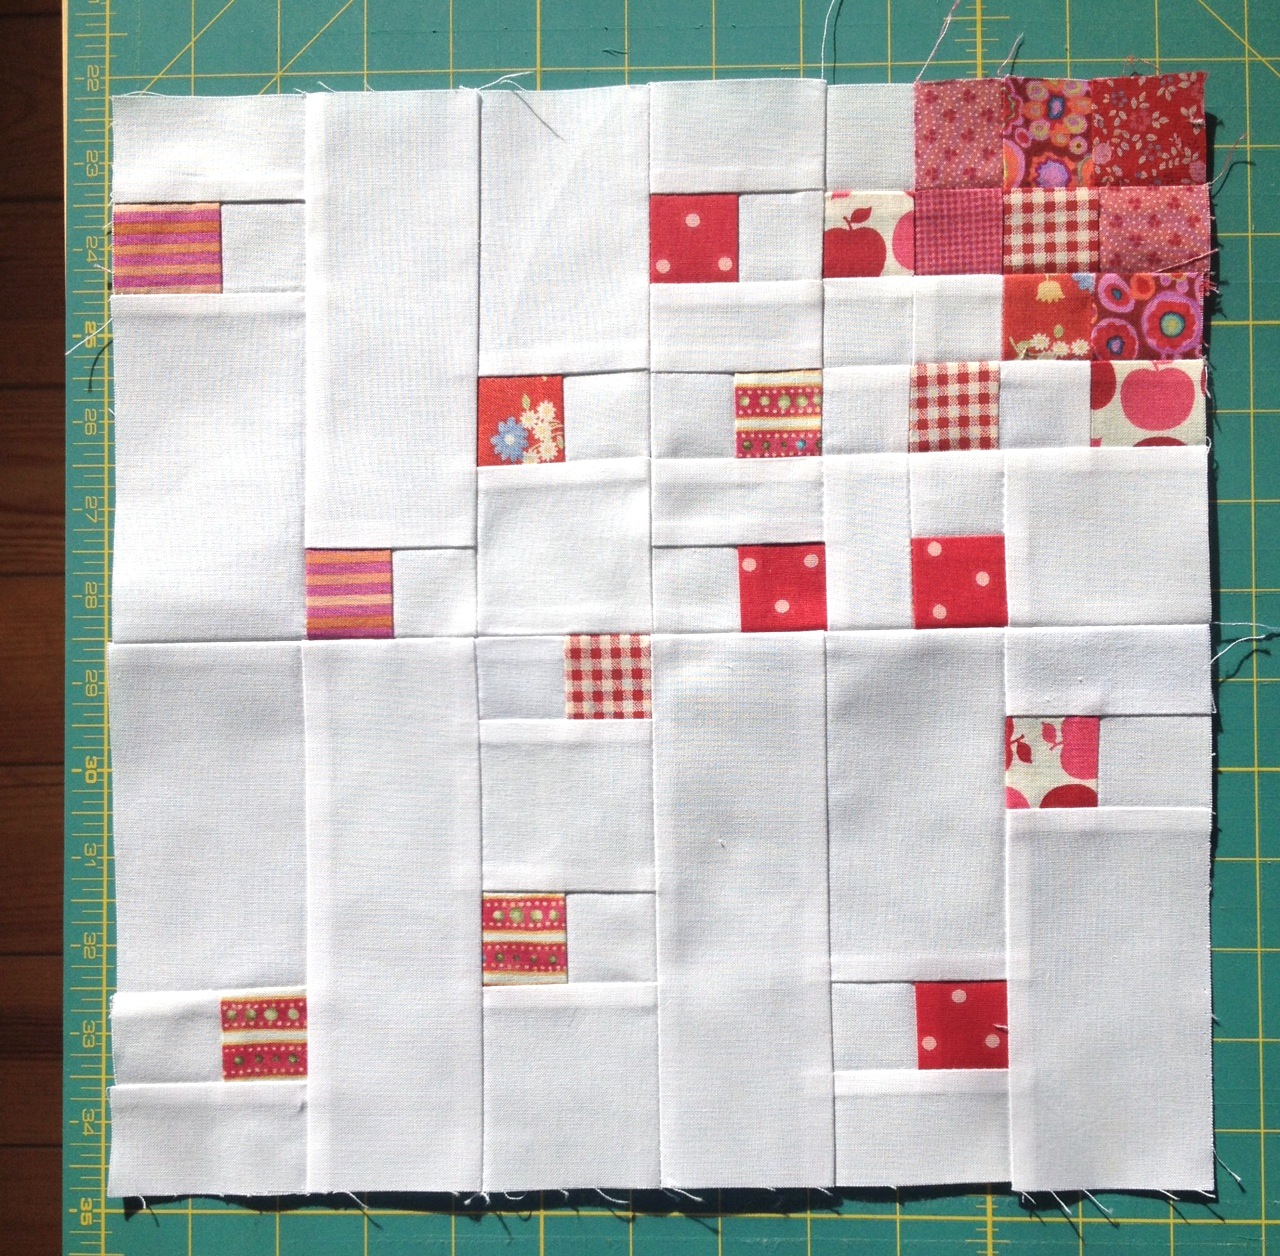
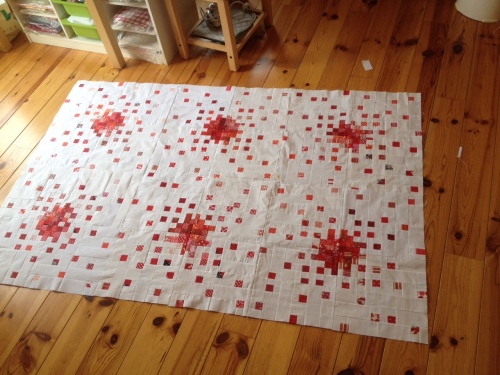
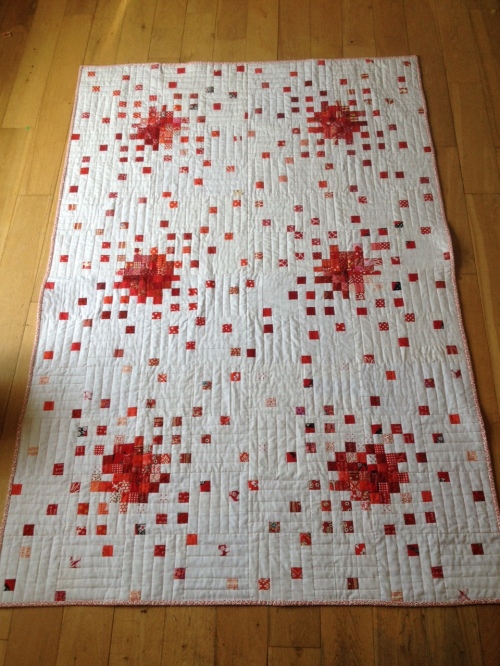
I love every single colour of the rainbow, each of them has a different spot in my everyday life, but I always tend to go for reds (I love red shoes!) and I always wanted to make a quilt where red was on the lead. Now, so far my plan was working and when I started to receive all those blocks and was putting them together, it was really exciting to see how that photo (above) with the design drawn on graph paper was materializing on fabric (and in colour!). I retouched a few bits here and there to make sure they all were 12.5″ square , made some extra blocks to complete the whole plan and here it is. The bee sisters did a good job (I promise to join with a much easier block in the future) and I am grateful for their help and effort they put into this. So what happened with the plan? Well… I envisioned a lovely busy pattern for the backing, some red gingham or small little red flowers… I found the right one over at Cindy’s and ain’t I lucky to live 30 minutes away from her??? I ordered 2.5 m of backing and why oh why didn’t I count and recount and count again about 5 more times? Yep, I was short, and time was running out. I wanted this quilt to be ready for sending it to Dublin for an exhibition. There was only one FQ available and didn’t have time to order any other fabric as I would be away for work the following 3 days. So what did I do? I used my own bed sheet, which was red of course (IKEA sheets are great for backing and sashing quilts!) and used the beautiful little busy flowery fabric for the binding… I still have plenty of it left. FullSizeRender copy 16 Conor decided he could help by mixing all the different sizes of safety pins into the same bowl, and discovered that they were even printed on the fabric! FullSizeRender copy 15 supernovabinding 
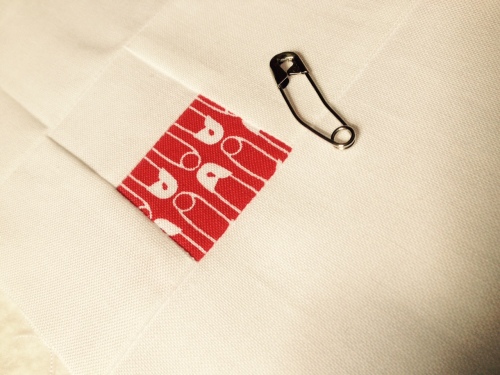
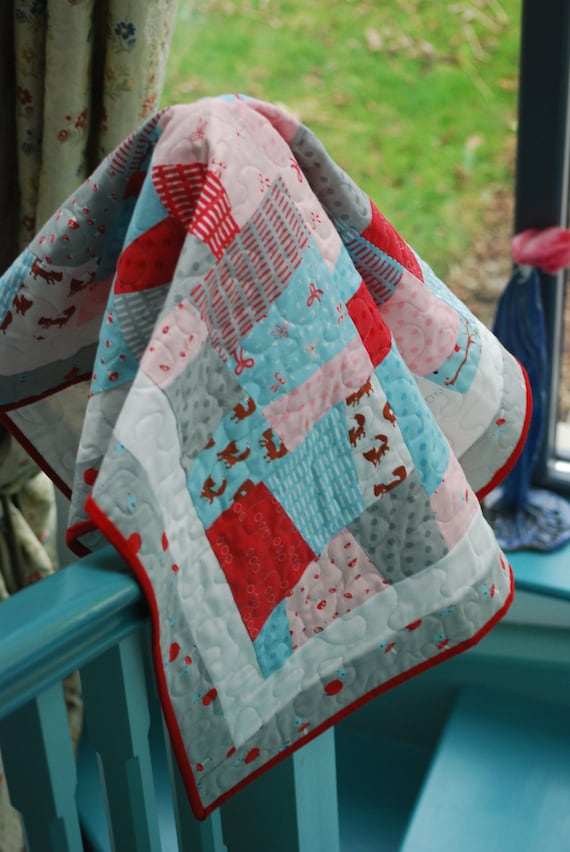
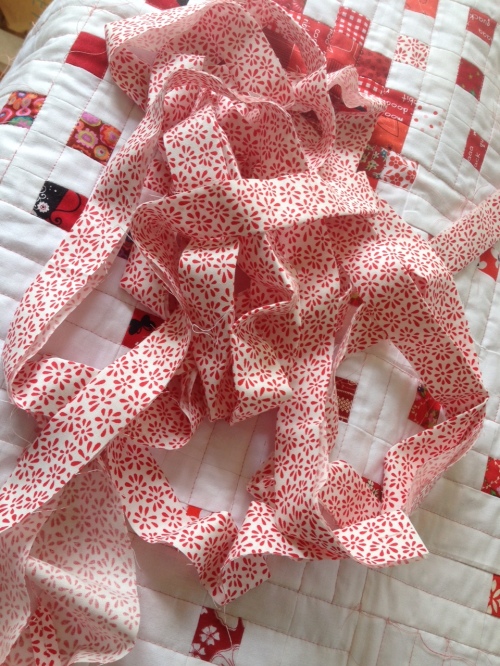
The quilting was another story. I didn’t really have a plan yet, but several ideas were cooking in my mind. I didn’t want to do the steepled free motion pattern. I like it, but I wanted to try something different. I wanted to highlight the piecing but straight lines from end to end wasn’t my cup of tea either. I wanted to do concentric circles or scallops, something curvy, but I couldn’t figure out how would I be able to turn the quilt and squeezing it under the arm without messing the stitching. And because I was literally running out of time… I did this: Each quarter of the block striped up alternately in horizontal and vertical lines, some in the ditch (or at least I tried to) others across the piece. And I really like it 🙂 And the final misfortune… My printer run out of ink (of course!!!)  so I took a permanent pen and drew my little ants on a piece of calico cotton and made my own handmade handwritten label. FullSizeRender copy 17 Hiding all the threads was really time consuming, and I haven’t finished yet (I know… please do not look very close if you happen to go to the exhibition… I WAS IN A HURRY!) FullSizeRender copy 8 I tried to squeeze some time before sending it off to take some more shots and check out how it would look on a single bed… Even though I will probably be using it to curl up in my sofa with a good book and a nice cupán te. FullSizeRender copy 9 So that’s it. The story of the Supernova Starburst Quilt, designed by me and partly pieced by Bee members of Modern Quilters Ireland. This quilt, and many others by my fellow Irish modern quilters, will be shown at the exhibition of quilts titled “Happiness” in Dublin, at St Patrick’s Mental Health Services, from May 25th to June 26th 2015. FullSizeRender copy

IMG_7194Details:

Pattern: Supernova Starbusrt (own pattern)

Fabric: red scraps and mainly Kona white.

Backing: Red IKEA cotton bedsheet!

Quilting: with a Brother In-novis 350E

Size: 48″ x 72″

Some blocks were made by Bee members of Modern Quilters Ireland

Don’t forget to visit Amy’s Blog to see more quilts in the Festival and vote for your favourite in each category from the 22nd to the 29th of May. Thank you for stopping by! spring-2015-BQF-Button

28 Comments

Filed under PATCHWORK

SMS Giveaway


Well well well… here I am again! I have been sewing like mad over the last weeks preparing for yet another fair. I’ll be selling lots of goodies in Kinvara, co.Galway, so whoever is local and want to pop down, you are more than welcome.

dots1

I have been making these beautiful bags, using natural linen, cool prints and the embroidery stitches that my machine has ( I finally managed to put them to use!). What do you think?

purple1

I will have a my Etsy shop full with new stock soon and you’ll find more of these bags. 

geome3

And…. because it is that time of the year again, the Sew Mama Sew Giveaway! remember?, I decided I’d give one of them away. I’ve chosen this one:

happyflo1

This fabric is really cute, isn’t it?  with all those funky flowers in my favourite colour combo…

So what do you need to do to win it? Just pop over to my Facebook page and follow the three steps. That’s all!

I’m planning to host a giveaway here soon for those of you who don’t use Facebook, just stay tuned!

Thank you for stopping by!

1 Comment

Filed under GIVEAWAYS - SORTEIG

New Cushions

FullSizeRender copy

A while ago I was one of the lucky winners to win a kit to make a pillow from Seamstar. It took me another while to put my hands on it but I finally managed to make a lovely patchwork pillow with piping (wow!) and even a side concealed zipper (wow wow!!!).. The kit contained  6 charm squares in mostly green prints, matching binding and piping cord, a zipper, linen, batting… and instructions. After that, I made another one, using 6 red charm squares (see the poor beheaded birds…?).


FullSizeRender

I followed the instructions step by step, quilting it by hand  stitching inside the seams of every linen square. The piping was not difficult to make, but I’m not sure about having to stitch so many times… First you need to stitch along when you are making it by placing the cord inside it. Then, as the instructions said, you stitch it all around the front panel (with raw seams together), and then you stitch the front and back panel to finish the pillow. It is hard to hide one of the 2 first lines of stitching and that means they show a bit in some sections. But hey, it is my first time trying with piping…

IMG_5450


For the red pillow, I used red DMC no.8  perle cotton thread and decided to cross each linen square. I was going to put the side concealed zipper too, but I changed my mind and decided to go for buttons. I had these big nice red buttons that seemed just perfect for it.

IMG_5447

And because I ran out of linen and couldn’t bother waiting to get more, I went to the local fabric shop and found this nice rustic cotton with subtle Christmas print.

FullSizeRender copy 2

I quite like hand quilting with perle cotton and the only stash I had were 5 colours from DMC. The thing is that I know I will be hand quilting more often in the future and I wanted to have a nice stash of threads. I remembered reading in a quilter’s blog, sorry I can’t remember which one!, that she had found a great supplier of perle cotton thread in South America that would ship free internationally. I happened to find it, or at least I think it is the one she was probably talking about, since it offered quite a good deal on threads and at a very reasonable price.

While it might be difficult to find a specific colour that you may need, it is a great way to build up a good stash of it. It is not DMC but now that I’ve tried it I can say it is as good. It is made in Brazil and the brand is Rubi. You can buy a mix of colours and it includes lovely variegated ones.


IMG_5451

These balls contain 40 metros, whereas the one on the right, DMC, contains 80metres. Yet, I bought 30 Rubi balls for €28.74, with free shipping, so that makes each ball at about €0.96. The average DMC 80m ball is about €2.50 (excluding shipping), so… I think you get a nice deal for a stash builder with Rubi! I will still buy DMC for specific colours if needed, but for now, I have a pretty good selection.

IMG_5452

9 Comments

Filed under PATCHWORK

Blogger’s Quilt Festival: Hand Quilt Category

photo 1 copy 6 I wasn’t sure whether I would be participating this time or not, but here I go again. I missed my chance last spring but I had participated way before and I had a nice experience. The amount of amazing quilts to be seen… you go “oooh, ahhh”  while admiring one after the other! So here’s my entry for the hand quilted category. I already wrote about it, so if you want to have a look at more close up photos you can pop over.

I really like this little quilt I made for a swap organised by the Irish Modern Quilters. There is a good amount of hand stitching in there! The central panel features a hand embroidered dragon fly that I designed inspired by a mobile in my daughter’s room. I used a variety of stitches to give different textures and a nice range of threads matching the colours of the patchwork border. photo 2 copy 6 I hand quilted spirals all around the dragon fly in different sizes. I wanted it to look like like whirly  breeze around it. On the patchwork border the stitches run along in arches, forming loops with each other, again in different colour threads. photo 1 copy 7 It is a small simple quilt, but I love it, it cheers you up with those bright warm colours, and my swap partner was very happy to receive it. So I thought it would be nice to show it of once more! photo 2 copy 7 If you would like to see more quilts in this category click here. But make sure you don’t miss to visit all the rest, it is truly amazing! Voting begins on the 1st of November… So fingers crossed!!!  

14 Comments

Filed under PATCHWORK